

Presto Canner Instruction Manual: A Comprehensive Guide
This manual provides detailed instructions for safe and effective use of your Presto pressure canner. It covers all aspects‚ from component identification to troubleshooting‚ ensuring successful food preservation.
Understanding Your Presto Pressure Canner
Your Presto pressure canner is a robust appliance designed for safely preserving foods at high temperatures. Unlike water bath canning‚ pressure canning reaches temperatures higher than boiling‚ essential for low-acid foods like vegetables‚ meats‚ and poultry. This process eliminates harmful botulism spores‚ ensuring food safety.
Familiarize yourself with the canner’s features. It operates by creating a sealed environment‚ building pressure with steam‚ and maintaining that pressure for a specific duration. Accurate pressure control is vital; the canner’s gauge indicates the internal pressure‚ which must align with the recipe’s requirements based on your altitude.
Understanding the difference between pressure cooking and canning is crucial. While the same appliance is used‚ the filling levels differ significantly. For pressure cooking‚ you can fill the canner up to the two-thirds mark‚ but for canning‚ adhere to the recommended fill limits specified in canning recipes to prevent vent pipe blockage and ensure safe processing. Always prioritize safety and follow established guidelines.
Safety First: Important Precautions
Pressure canning involves high temperatures and pressures‚ demanding strict adherence to safety guidelines. Always read this entire manual before operating your Presto canner. Never attempt to open the canner until the pressure has returned to zero and the lid is unlocked – forced opening can result in severe burns.
Regularly inspect all components‚ particularly the sealing ring and overpressure plug. Replace the overpressure plug each time you replace the sealing ring‚ or sooner if it shows any signs of damage – hardness‚ deformation‚ cracks‚ wear‚ or pitting. A compromised overpressure plug is a critical safety hazard. It’s recommended to replace both at least every three years‚ using only genuine Presto replacement parts.

Close supervision is essential during operation. Do not fill the canner beyond recommended levels; overfilling can block the vent pipe‚ leading to excess pressure. Never modify or disable any safety features. If you encounter any issues‚ discontinue use and consult the troubleshooting section or contact Presto customer support.
Canner Components and Their Functions
Your Presto pressure canner consists of several key components working in harmony to ensure safe and effective food preservation. The canner body provides the structural base‚ while the lid creates the airtight seal necessary for pressure build-up. The sealing ring‚ typically made of rubber‚ ensures this seal remains intact.
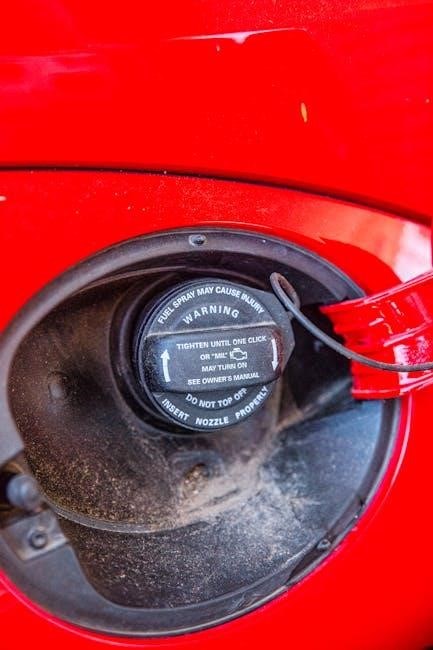
The overpressure plug is a crucial safety feature‚ releasing excess pressure to prevent dangerous situations. The vent pipe (steam vent) allows steam to escape during venting‚ and must remain unobstructed. Pressure regulator weights control the internal pressure‚ dictating the processing temperature.
The pressure gauge displays the internal pressure‚ allowing you to monitor the canning process accurately; The locking mechanism secures the lid to the body‚ preventing accidental opening during operation. Understanding the function of each component is vital for safe and successful canning. Always use genuine Presto replacement parts to maintain optimal performance and safety.

Preparing Jars for Canning
Proper jar preparation is essential for successful and safe canning. Begin by thoroughly washing jars in hot‚ soapy water‚ or running them through a dishwasher cycle. Inspect each jar for cracks‚ chips‚ or any damage – discard any flawed jars immediately. Do not use jars with re-used lids.
Before filling‚ jars must be sterilized. This can be achieved by boiling them for 10 minutes‚ or by processing them in the pressure canner for a specified time (consult your recipe). Keep the jars hot until ready to fill to prevent thermal shock.
Lids require separate preparation. Modern lids no longer require boiling‚ but should be washed in warm‚ soapy water. Ensure the sealing compound is intact and flexible. Always use new lids for each canning session. Properly prepared jars and lids are crucial for creating an airtight seal‚ preventing spoilage and ensuring food safety.
Food Preparation Guidelines
Thorough food preparation is paramount for safe and high-quality canning. Begin by selecting fresh‚ high-quality produce‚ free from blemishes or spoilage. Wash all fruits and vegetables meticulously. Follow tested recipes precisely‚ as ingredient ratios and processing times are critical for safety.
Raw packing versus hot packing are two common methods. Raw packing involves filling jars with uncooked food‚ while hot packing requires briefly heating the food before jarring. Hot packing generally results in better color and flavor retention.
Adjustments for altitude are crucial. Higher altitudes require increased processing times to achieve adequate sterilization. Consult altitude adjustment charts specific to your recipe and location. Do not overfill the canner; for pressure cooking‚ limit to 2/3 full‚ and for soups/grains‚ no more than 1/2 full to prevent vent pipe blockage. Proper preparation minimizes risks and maximizes the shelf life of your canned goods.
Water Levels for Canning
Maintaining correct water levels is vital for both pressure and water bath canning with your Presto canner. For pressure canning‚ always add the minimum amount of water specified in your recipe – typically 2 to 3 inches – to create steam and prevent the canner from overheating. Do not overfill‚ as this can interfere with proper venting.
Water bath canning requires jars to be fully submerged in boiling water‚ with at least 1 to 2 inches of water covering the jar lids. Ensure sufficient water is added before heating the canner to prevent the heating element from being exposed.
The specific water amount depends on the canner size and the number of jars being processed. Always refer to your recipe and the canner’s instructions. Insufficient water can lead to inadequate heat penetration and potential spoilage‚ while excessive water may cause jars to jostle and break during processing.
Operating Instructions: Pressure Canning
Begin by adding the specified amount of water to the Presto canner‚ ensuring it doesn’t exceed the maximum fill line for pressure cooking – 2/3 full is generally safe. Load the prepared jars onto the rack‚ ensuring they don’t touch each other or the canner walls. Secure the lid‚ locking it into place according to the manufacturer’s instructions;
Heat the canner on high until a steady stream of steam vents from the vent pipe for 10 minutes. This crucial step removes air from inside‚ ensuring accurate pressure. After venting‚ attach the weighted gauge or close the petcock‚ depending on your model.
Allow the pressure to build to the level specified in your recipe. Once the correct pressure is reached‚ begin timing the processing period. Maintain consistent pressure throughout the entire process. After processing‚ turn off the heat and allow the canner to cool naturally – do not force cool it!
Operating Instructions: Water Bath Canning
To begin water bath canning with your Presto canner‚ place the rack inside and add enough water to cover the jars by at least 1-2 inches. Pre-heating the water isn’t strictly necessary‚ but it can reduce processing time. Carefully load the filled jars onto the rack‚ ensuring they don’t touch each other or the sides of the canner.
Secure the lid and bring the water to a rolling boil. Once boiling‚ begin timing the processing period as specified in your recipe. Maintain a vigorous‚ rolling boil throughout the entire processing time. Adjust the heat as needed to maintain this consistent boil.
It’s crucial to ensure the water level remains sufficient throughout processing; add more boiling water if necessary. Once the processing time is complete‚ turn off the heat and allow the jars to sit in the hot water for 5 minutes before removing them. Handle jars carefully to avoid thermal shock.
Venting the Canner
Proper venting is critical for safe pressure canning. Before each use‚ inspect the vent pipe and ensure it’s clear of obstructions. During the heating process‚ a steady stream of steam will escape from the vent pipe – this is normal. Allow this steam to vent continuously for 10 full minutes to remove all air from inside the canner.
This initial venting step is essential for achieving the correct pressure. After the 10-minute venting period‚ close the vent with the weight or valve‚ depending on your canner model. The pressure will then begin to build. Monitor the pressure gauge closely and adjust the heat to maintain the desired pressure throughout the processing time.
If the vent pipe becomes blocked during processing‚ immediately turn off the heat and allow the canner to cool completely before attempting to clear the blockage; Never force the vent open while the canner is pressurized.
Processing Times for Common Foods
Accurate processing times are vital for food safety. These times vary significantly depending on the food type‚ jar size‚ and your altitude. Always consult a current‚ research-based canning guide – such as those from the National Center for Home Food Preservation – for specific recommendations.

Generally‚ low-acid foods like vegetables‚ meats‚ and poultry require longer processing times at higher pressures than high-acid foods like fruits and pickles. Processing times are provided in minutes and are based on a specific pressure (usually 10 or 15 PSI‚ depending on altitude).
Adjustments for altitude are crucial. As altitude increases‚ the boiling point of water decreases‚ requiring higher processing pressures or longer processing times to ensure adequate heat penetration. Failure to adjust for altitude can result in under-processed food and a risk of botulism. Refer to altitude adjustment charts in your canning guide.

Cooling Down and Removing Jars
Allow the canner to cool naturally; do not attempt to speed up the cooling process with cold water or forced air. Rapid cooling can cause jar breakage or seal failure. Let the pressure return to zero‚ and wait an additional 10 minutes before carefully removing the weight.
Once the pressure is fully released‚ carefully open the lid‚ tilting it away from you to avoid steam burns. Use jar lifters to gently remove the jars‚ keeping them upright. Place the jars on a towel-covered surface‚ spaced apart to allow for air circulation.
Avoid disturbing the jars for at least 12-24 hours to allow the seals to set properly. You’ll hear a “popping” sound as the jars seal‚ indicating a vacuum has formed. After cooling‚ check the seals by pressing down on the center of each lid; it should not flex. Any unsealed jars should be refrigerated and consumed promptly or reprocessed with new lids.
Troubleshooting Common Issues
If the canner fails to pressurize‚ ensure the lid is properly sealed and the vent pipe isn’t blocked. Check the sealing ring for damage or improper seating. Insufficient liquid can also prevent pressure build-up; add more hot water as needed.
Excessive steam venting during processing might indicate an incorrect weight or a faulty sealing ring. Verify you’re using the correct weight for your altitude and food type. A damaged or worn sealing ring must be replaced immediately.
Jar lids not sealing often results from improper headspace‚ chipped jar rims‚ or insufficient processing time. Ensure correct headspace measurements‚ inspect jars for damage‚ and reprocess with new lids if necessary. Always use genuine Presto replacement parts for optimal performance.
Blocked vent pipe can cause dangerous pressure build-up. Replace the overpressure plug every time you replace the sealing ring‚ or sooner if it shows wear. Close supervision is necessary during operation.
Maintaining Your Presto Canner
Regular maintenance ensures your Presto canner’s longevity and safe operation. After each use‚ thoroughly wash all components – the pot‚ lid‚ and rack – with warm‚ soapy water. Inspect the sealing ring for cracks‚ hardness‚ or deformation; replace it at least every three years‚ or more frequently with heavy use.
The overpressure plug is a critical safety feature. Replace it each time you replace the sealing ring‚ and also if it becomes pitted‚ worn‚ or damaged. Using genuine Presto replacement parts is crucial for maintaining the canner’s safety standards.
Periodically check the vent pipe for any obstructions. Ensure it’s clear to allow for proper venting during the pressurization and cooling phases. Avoid abrasive cleaners that could damage the canner’s surfaces. Proper storage in a dry place will also help prevent corrosion.
Following these simple steps will keep your Presto canner in optimal condition for years of reliable food preservation.
Replacing the Sealing Ring
The sealing ring is vital for creating a proper seal during pressure canning. Over time‚ it can become worn‚ cracked‚ or hardened‚ compromising the canner’s ability to maintain pressure. Regular inspection is key – check before each use for any signs of damage.
To replace the sealing ring‚ carefully remove the old ring from the lid. Ensure the groove is clean and free of debris before installing the new one. Gently roll the new ring into place‚ ensuring it sits evenly and securely within the lid’s groove. A properly seated ring is essential for a safe seal.
It’s recommended to replace the sealing ring at least every three years‚ or more often if you notice any deterioration. Always use genuine Presto replacement rings to guarantee compatibility and maintain the canner’s safety features. Replacing the overpressure plug simultaneously is also advised.
A new sealing ring ensures a reliable seal‚ contributing to safe and successful home canning.
Replacing the Overpressure Plug
The overpressure plug is a crucial safety feature‚ designed to release excess pressure if the vent pipe becomes blocked. It’s a one-time-use safety device and must be replaced each time you replace the sealing ring‚ or sooner if it shows any signs of damage.
Inspect the plug carefully for hardness‚ deformation‚ cracks‚ wear‚ or pitting. A compromised plug may not function correctly‚ potentially leading to a dangerous situation. Do not attempt to reuse a plug that exhibits any of these issues.
To replace the overpressure plug‚ locate it in the lid of the canner. Gently remove the old plug and insert a new‚ genuine Presto replacement. Ensure it’s firmly seated and properly aligned. Do not force it; a snug fit is sufficient.

Regular replacement of the overpressure plug‚ alongside the sealing ring‚ is a vital safety precaution. Using only genuine Presto parts guarantees the plug will function as intended‚ protecting you and your family.
Understanding Vent Pipe Blockages
A clear vent pipe is essential for safe pressure canning. Blockages prevent proper pressure regulation‚ potentially leading to dangerous pressure build-up within the canner. Food particles‚ particularly from starchy foods like soups‚ grains‚ and beans‚ are the most common culprits.
Overfilling the canner exacerbates the risk of vent pipe blockage. When processing foods that expand during cooking‚ adhere strictly to the recommended fill limits – no more than halfway full. This allows sufficient space for expansion and minimizes the chance of food reaching the vent.
Recognizing a blockage is crucial. Difficulty achieving or maintaining the correct pressure‚ or unusually slow venting‚ are key indicators. Immediately turn off the heat and allow the canner to cool completely before attempting to clear the obstruction.
Never attempt to clear a blocked vent pipe while the canner is pressurized. This is extremely dangerous. Always prioritize safety and follow the manufacturer’s instructions for troubleshooting and maintenance. Regular inspection and careful food preparation are the best preventative measures.
Genuine Presto Replacement Parts
Maintaining your Presto canner requires periodic replacement of certain parts to ensure continued safe and effective operation. Using genuine Presto replacement parts is absolutely critical; aftermarket parts may not meet the precise specifications required for proper function and could compromise safety.
The sealing ring and overpressure plug are the most frequently replaced components. The sealing ring creates an airtight seal‚ while the overpressure plug provides a secondary safety mechanism‚ releasing excess pressure if the vent pipe becomes blocked. These should be replaced together.
Presto offers a complete range of replacement parts directly through their website and authorized retailers. Avoid purchasing parts from unverified sources‚ as counterfeit or substandard components pose a significant risk. Always verify the part number before ordering.

Regularly inspect your canner’s components for wear and tear. A hardened‚ deformed‚ cracked‚ worn‚ or pitted sealing ring or overpressure plug must be replaced immediately. Prioritizing genuine parts safeguards your food preservation efforts and‚ most importantly‚ your safety.
Recommended Replacement Schedule

To guarantee the safety and longevity of your Presto pressure canner‚ adhering to a consistent replacement schedule for key components is paramount. Presto recommends replacing the sealing ring and overpressure plug at least every three years‚ even if they appear to be in good condition.
However‚ more frequent replacement may be necessary depending on usage. If you can frequently‚ or notice any signs of deterioration – hardening‚ cracking‚ deformation‚ or pitting – replace these parts immediately. Don’t wait for a scheduled replacement if visible damage is present.
The vent pipe should be inspected regularly for blockages and replaced if damaged. While there isn’t a fixed replacement schedule for the vent pipe‚ any signs of corrosion or obstruction warrant immediate attention.
Maintaining a log of replacement dates can be helpful. Prioritizing these replacements isn’t merely about maintaining functionality; it’s about ensuring the continued safety of your food preservation process. Always use genuine Presto replacement parts to uphold these safety standards.
Filling Limits: Pressure Cooking vs. Canning

Understanding the distinct filling requirements for pressure cooking versus canning with your Presto canner is crucial for safe operation. These limits differ significantly due to the varying expansion rates of foods during each process.
When pressure cooking‚ do not fill the canner more than two-thirds full. This allows sufficient space for food to expand during cooking without obstructing the vent pipe and causing excessive pressure build-up. For soups‚ grains‚ dry beans‚ and peas – foods known to expand considerably – limit the fill level to no more than half full.
Canning‚ however‚ requires precise fill levels dictated by the specific food being processed‚ as outlined in approved canning recipes. These recipes account for the expansion of food during the canning process. Never deviate from recommended fill levels for canning‚ as this can compromise the seal and lead to spoilage.
Overfilling‚ regardless of the method‚ poses a risk of blocking the vent pipe‚ creating dangerous pressure‚ and potentially causing canner malfunction. Always prioritize safety by adhering to these guidelines.
Using Google Translate for Manuals
If your Presto canner instruction manual is in a language you don’t understand‚ Google Translate offers a convenient solution. You can translate text inputted via keyboard‚ handwriting‚ photos‚ or voice input into over 200 languages using the Google Translate application or the web service.
For shorter text segments‚ simply copy and paste up to 5‚ into the Google Translate interface. Select the source and target languages‚ and the translation will appear instantly. For translating entire documents‚ upload the file (supported formats vary) through the “Documents” tab on the Google Translate website.
The service automatically detects the document’s original language‚ though you can manually specify it if needed. Google Translate provides a quick and accessible way to understand the instructions‚ ensuring safe and effective operation of your canner. However‚ always double-check critical safety information with official English resources when possible‚ as automated translations may not always be perfectly accurate.
Remember to utilize this tool responsibly and prioritize safety by verifying key instructions.